Set up Settings → Patient messaging: email, SMS and WhatsApp channels, DKIM, the bounce mailbox and message wording
Connect your practice's mail server and SMS gateway, prove each works with a real test, sign your mail so it is not treated as spam, connect WhatsApp once your practice has arranged it with Meta, and choose which channel each kind of message goes out on: reminders and recalls as well as letters and referrals. The last section covers the wording of recall texts, which lives on a different screen.
Before you start
- Open Settings in the sidebar, then Patient messaging under People & communications. You need the
practice.adminpermission (the Admin role). - Have these ready from whoever runs your email: the mail server's name and port, a username and password if it needs one, and the address your practice sends from. For signing, you also need someone who can add records to your domain's DNS.
- This screen decides what your practice is willing and able to send. It does not touch consent. Whether a patient agrees to email or SMS is recorded on their own record, and nothing here overrides it.
Note: Older notes may call this screen Settings → Communications. It is the same screen. Settings → Messages is a different screen, the SMS send queue (KB-123 — Read the reminder queue in Settings → Messages, and know which messages screen you need).
How the screen is organised
The page answers two separate questions, in two sections.
- Channels answers "can we send?" One card each for SMS, Email and WhatsApp: is there a gateway, does it work.
- What goes out on what answers "should we, for this kind of message?" A grid of message types against channels.
Both must be set for a message to go out, and so must the patient's consent.
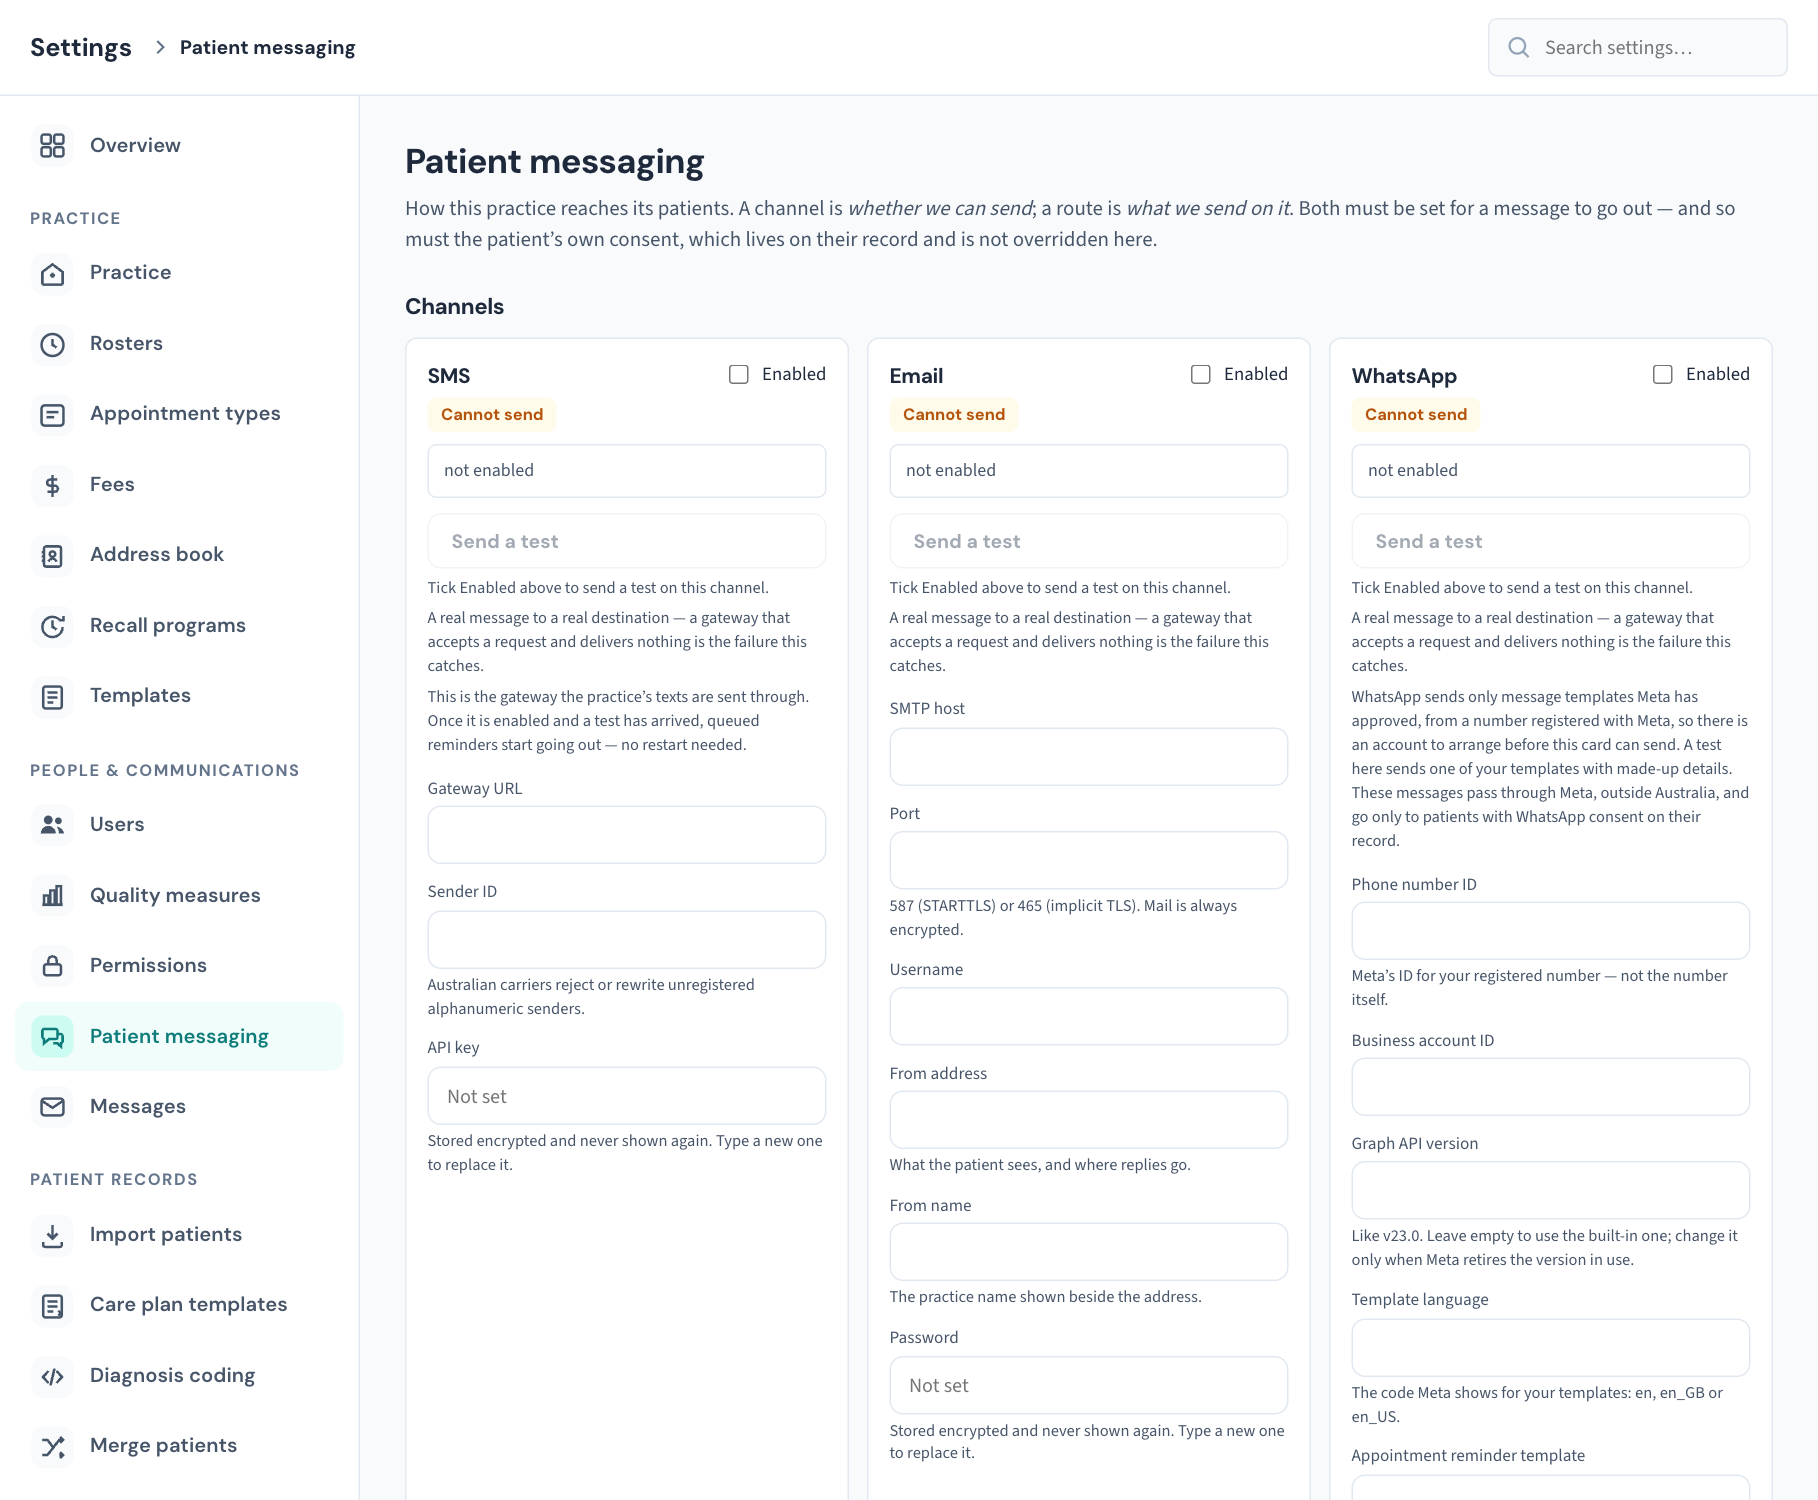
Reading a channel card
| On the card | Meaning |
|---|---|
| Can send | A message on this channel can leave the building today. |
| Cannot send | It cannot, and the line underneath says why. |
| Enabled tick box | What your practice intends. Ticking it does not by itself make the channel able to send. |
| "not enabled" | The Enabled box is not ticked. |
| "no credential has been entered for this gateway" | The channel is enabled, no password or key is stored, and no test has succeeded. |
| "the gateway has never completed a test send" | Details are entered and nobody has proved they work. Use Send a test. |
| Last verified with a date and time | When a test last got through. |
| Last error: … | What the gateway said the last time a test failed. |
Enabled and Can send are deliberately different things. A practice can tick Enabled, see a tick, and have nothing delivered because the password was never entered. The badge is the one to trust.
Important: There is no Save button on this page. Each field saves when you click or tab out of it, and each tick box saves when you tick it. If a save is refused, a red message appears at the top of the page.
Set up email
- On the Email card, enter the SMTP host (your mail server's name) and click out of the field.
- Enter the Port: 587 or 465. Mail is always encrypted. Curaeon will not fall back to an unencrypted connection, and a mail server that cannot encrypt, or whose certificate cannot be verified, is refused.
- Enter the Username, if your mail server needs one. A mail server on your own network that accepts mail from the practice server without signing in needs neither a username nor a password.
- Enter the From address: what the patient sees, and where replies go.
- Enter the From name: the practice name shown beside the address.
- Type the mail account's Password and click out of the field. The box empties and shows "•••••••• (stored)". The password is stored encrypted and is never shown again, to you or to anyone. To change it, type a new one.
- Tick Enabled.
- Choose Send a test, and enter an email address you can check. Use an address at a large outside provider, not one on your own domain.
- Check that the test arrived. It is a short message saying the practice is checking its email setup, with no patient information in it.
When the test gets through, the card changes to Can send and shows Last verified. If it fails, a red line at the top reads "Email test failed" with the mail server's reason, and the card shows it as Last error. That sentence is what to give your email provider.
Two things to know:
- Changing the password clears the verification. A new password has not been proved, so the card returns to Cannot send until you send a test again.
- Send a test is unavailable until Enabled is ticked; the card says "Tick Enabled above to send a test on this channel."
Sign your mail (DKIM), and check the DNS records
Mail from a practice's own domain that is not signed is what spam filters treat worst. Filtered mail does not bounce, so from Curaeon every letter still reads as sent while the patient never sees it. Three DNS records decide this: SPF, DKIM and DMARC. They live in your domain's DNS, not in Curaeon, so whoever manages your domain publishes them. What Curaeon does is sign the mail and tell you which record is missing.
Under Signing and DNS on the Email card:
- Ask whoever manages your domain to create a DKIM key pair and publish the public half in DNS, with SPF and DMARC records beside it.
- Enter the DKIM selector they chose. It is public: it names where the public key is published.
- Paste the private half into DKIM private key and click out of the field. It is stored encrypted and never shown again.
- Choose Check DNS records.
The selector and the key go together. Entering one without the other is refused, and so is a key that cannot be read as a signing key.
Check DNS records looks up your records as they are published right now and lists SPF, DKIM and DMARC, each with one of four states and a sentence:
| State | Meaning |
|---|---|
| ok | Published and usable. For DMARC it may add that the record is in monitoring mode, which is the right place to start. |
| missing | Nothing is published where receivers look. The sentence says what to publish. |
| problem | A record is there and it is wrong, for example an SPF record that allows any server to send as your domain, or a DKIM key that has been revoked. |
| unknown | The lookup did not answer, so it could not be checked. Try again. |
If the check says "No from address is set for the email channel, so there is no domain to check", fill in From address first. "The check could not run. That is not the same as no records." means the request itself failed; try again.
Tip: The DNS check proves the records are published. It does not prove a message arrives. After publishing all three, send a test to a mailbox at a large provider and confirm it lands in the inbox, not in spam.
Set up the bounce mailbox
Most practices send through their own mail server. That server accepts each message and, if the patient's address turns out to be wrong, sends a failure report back by email hours later. The Bounce mailbox is where Curaeon reads those reports. Without it, a letter your mail server accepts and then cannot deliver is never noticed, and the dead address keeps being used.
- Under Bounce mailbox on the Email card, enter the IMAP host.
- Enter the Port, or leave it blank for 993.
- Enter the Username of the mailbox.
- Enter the Folder where bounces land, if you filter them. The usual answer is INBOX.
- Type the mailbox Password and click out of the field. It is stored encrypted and never shown again.
Curaeon reads the mailbox every 15 minutes. A permanent failure report marks that patient's email address as refused: it stops being offered when someone sends to that patient, the send window says why, and correcting the address on the patient's record clears the mark automatically. Out-of-office replies, delays, read receipts and ordinary mail in the folder are left alone.
Important: A bounce brings the original message back with it, so this mailbox will hold returned letters. Treat it like any other clinical mailbox: restricted access, and not a shared general inbox.
The SMS card
The SMS card is where your practice's SMS gateway is connected. It has Gateway URL, Sender ID and API key, and works the same way as Email: fields save as you leave them, the key is stored encrypted and never shown again, and Send a test sends a real text to a mobile number you enter.
- Enter the Gateway URL your SMS provider gave you.
- Enter the Sender ID. Australian carriers reject or rewrite unregistered alphanumeric sender IDs, so use the sender your SMS provider registered for you.
- Type the API key and click out of the field.
- Tick Enabled.
- Choose Send a test, enter a mobile number you can check, and confirm the text arrives.
Once a test has arrived the card reads Can send, and from then on this is the gateway your practice's texts go through: reminders, recalls, INR messages, and letters or referrals routed by SMS. Texts already waiting in the queue start going out within a minute or so. Nothing needs restarting.
Until a gateway is connected, texts wait in the queue, unsent and not marked failed. What is waiting, and what has gone, is on Settings → Messages (KB-123 — Read the reminder queue in Settings → Messages, and know which messages screen you need).
Note: Some practice servers were set up with an SMS gateway in the server's own configuration, before the card could connect one. That still works. If the card is also set up and can send, the card is the one used.
The WhatsApp card
WhatsApp is different from the other two channels. Meta allows a business to start a conversation only with a message template it approved in advance, sent from a number registered with Meta. So before this card can send, your practice arranges an account with Meta and has its templates approved. KB-140 — Arrange WhatsApp with Meta: the account, the number and the message templates Curaeon needs before it can send walks through that, with the exact wording to submit. Come back here with the values it tells you to collect.

| Field | What goes in it |
|---|---|
| Phone number ID | Meta's ID for your registered number. Not the phone number itself. |
| Business account ID | Your WhatsApp Business account's ID at Meta. |
| Graph API version | Leave empty. Change it only when Meta retires the version in use; it looks like v23.0. |
| Template language | The code of the language your templates were approved in: en, en_GB or en_US. |
| Appointment reminder template, Appointment confirmation template, Appointment cancelled template, Missed appointment template, Visit completed template, Recall template, INR reminder template | The name of the approved template for each. Leave one empty and that message is not sent on WhatsApp. |
| Letter with document template, Letter notification template | The templates for letters and referrals: one carries the letter as a PDF, the other says a letter is ready. |
| Access token | The permanent token from Meta. Stored encrypted and never shown again. |
You can also write a template here instead of on Meta's website. Once the card has its Business account ID and Access token, a WhatsApp templates section appears lower on this screen: write the wording, choose Submit to Meta, and Curaeon fills in the template's name on this card when Meta approves it. KB-140 — Arrange WhatsApp with Meta: the account, the number and the message templates Curaeon needs before it can send has the steps.
Then tick Enabled and choose Send a test, to a mobile that has WhatsApp. There is no plain-text test on WhatsApp: the test sends one of your own templates with made-up details in its gaps, which also proves the template's name, its language and its number of gaps. When it arrives the card reads Can send. Until then the card says which piece is missing.
Important: A WhatsApp message passes through Meta, outside Australia. Curaeon sends on WhatsApp only to patients whose record has WhatsApp consent, which is its own consent, separate from SMS. Record it on the patient's details (WhatsApp consent, beside SMS and email consent) only when the patient has agreed to it.
Three things WhatsApp cannot carry, because only the approved wording is sent: a recall campaign in your own wording (those patients get the next channel you have ticked), the note a clinician types when sending a letter, and one-off messages, which have no template.
Choose what goes out on what
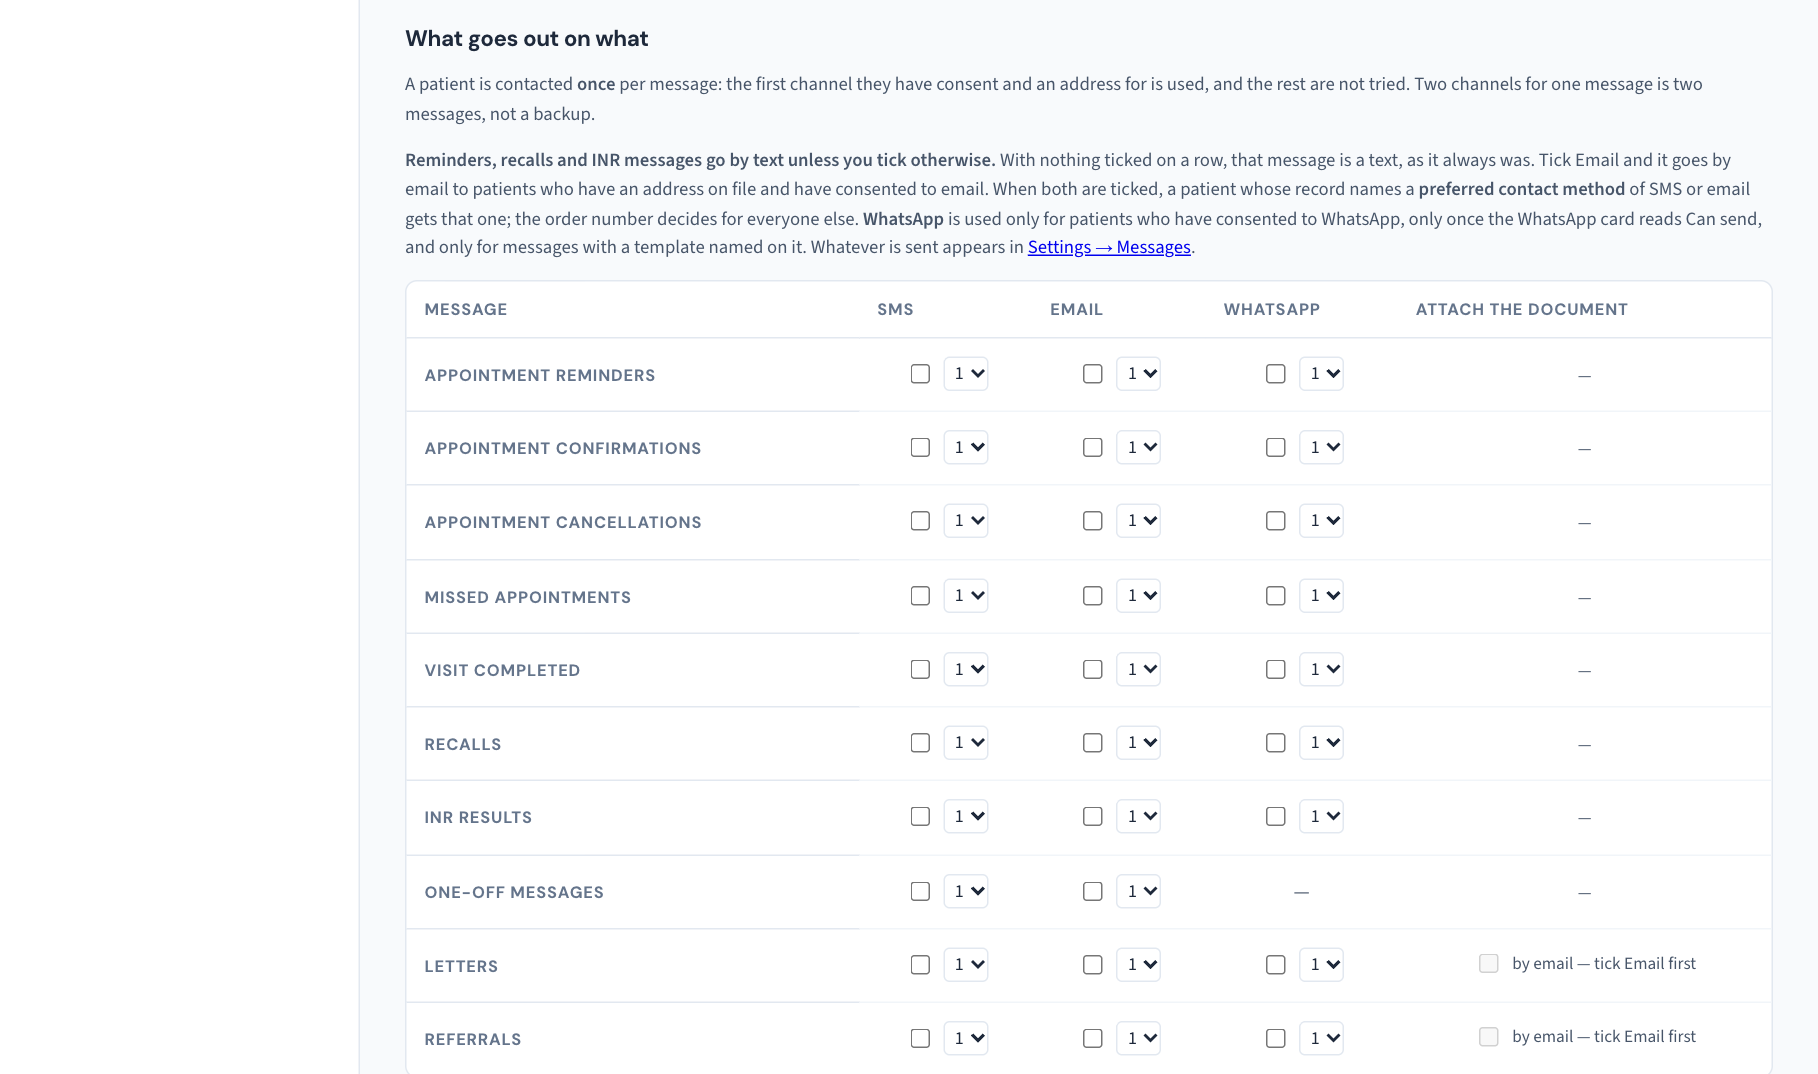
The grid has a row for each kind of message: Appointment reminders, Appointment confirmations, Appointment cancellations, Missed appointments, Visit completed, Recalls, INR results, One-off messages, Letters and Referrals. Every row has a tick box and an order number under SMS and Email. WhatsApp has a tick box on the rows it has a template for: every row except One-off messages, where it shows a dash. A WhatsApp tick is used only once the WhatsApp card reads Can send and a template is named for that message, and only for patients with WhatsApp consent.
Reminders, recalls and INR messages go by text unless you tick otherwise. With nothing ticked on a row, that message is a text, exactly as it was before the grid existed. Tick Email and it goes by email to patients who have an email address on file and have consented to email. Once you tick anything on a row, your ticks are the whole answer: if you tick Email and leave SMS unticked, that message is not texted to anybody, including patients who cannot be emailed.
- Tick the channel a kind of message may use.
- If you tick more than one channel on a row, set the order: 1 is tried first.
- On the Letters and Referrals rows, tick Attach the document if the email should carry the letter itself. It becomes available once Email is ticked on that row; until then it reads "by email — tick Email first".
A patient is contacted once per message, on one channel. Which one is the patient's choice where they have made one: if their record names a preferred contact method of SMS or email, and you have ticked that channel for the message, that is the channel used, whatever order number you gave it. For everyone else (no preference recorded, a preference for a phone call, or a preferred channel that cannot reach them) Curaeon uses the first channel in your order that reaches the patient. The preference never adds a channel: if you have not ticked Email for recalls, nobody is emailed a recall. An email needs an address on file, the patient's consent to email, and an address no mail server has refused; a text needs a mobile number; a WhatsApp message needs a mobile number and the patient's consent to WhatsApp. A patient your ticked channels cannot reach is skipped in a bulk send and counted, and a single Send reminder is refused with a sentence saying so. Two channels for one message would be two messages, not a backup.
Attach the document is email only. With it off, the patient gets an email telling them a letter exists. With it on, the letter goes as a password-protected PDF; the password is the patient's date of birth unless the sender sets another (KB-050 — Email a letter to a patient: password, refused characters, "I can't open it").
Note: For Letters and Referrals there is no default: no ticked, working channel on that row means the document cannot be sent to the patient. Email on any row needs the Email card to read Can send; a ticked Email over a mail server that cannot send is ignored. Whatever is sent, on either channel, appears in Settings → Messages (KB-123 — Read the reminder queue in Settings → Messages, and know which messages screen you need).
Messages sent without anyone pressing a button
Under the grid, Sent without anyone pressing a button has a tick box for each message. Each is off until you tick it, and each saves at once. A message goes on the channel ticked for its row of the grid, or by text if nothing is ticked there. A patient who cannot be reached on those channels is skipped, and the booking, cancellation or visit is recorded all the same.
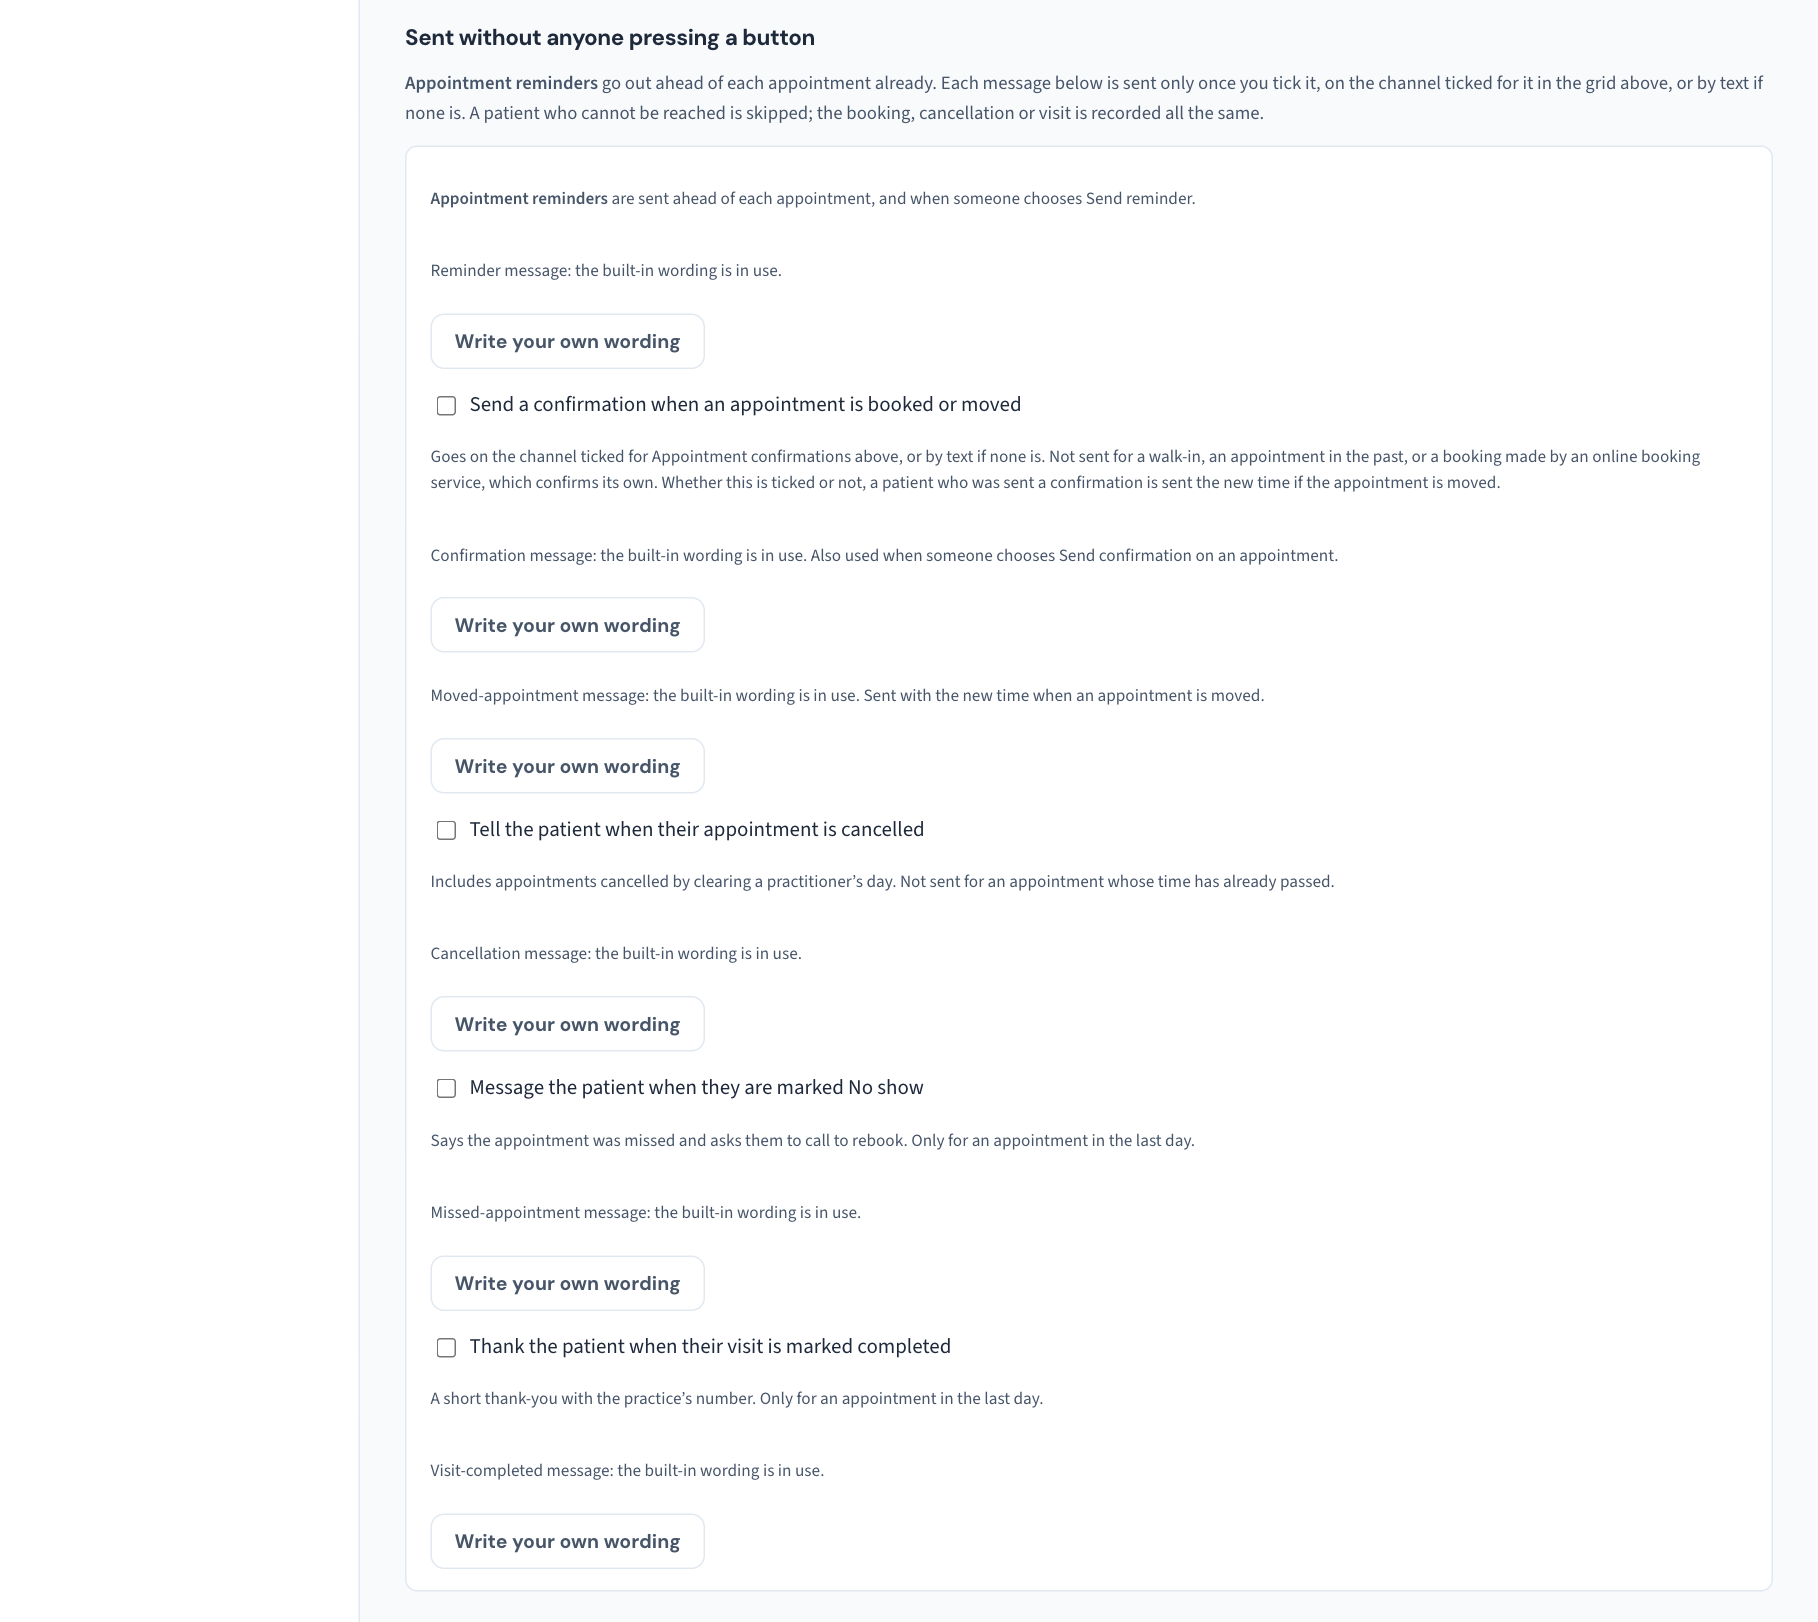
Choose when the appointment reminder goes
Appointment reminders are the one automatic message that is on from the start. At the top of this section, Send the reminder sets how far ahead of each appointment the reminder goes.
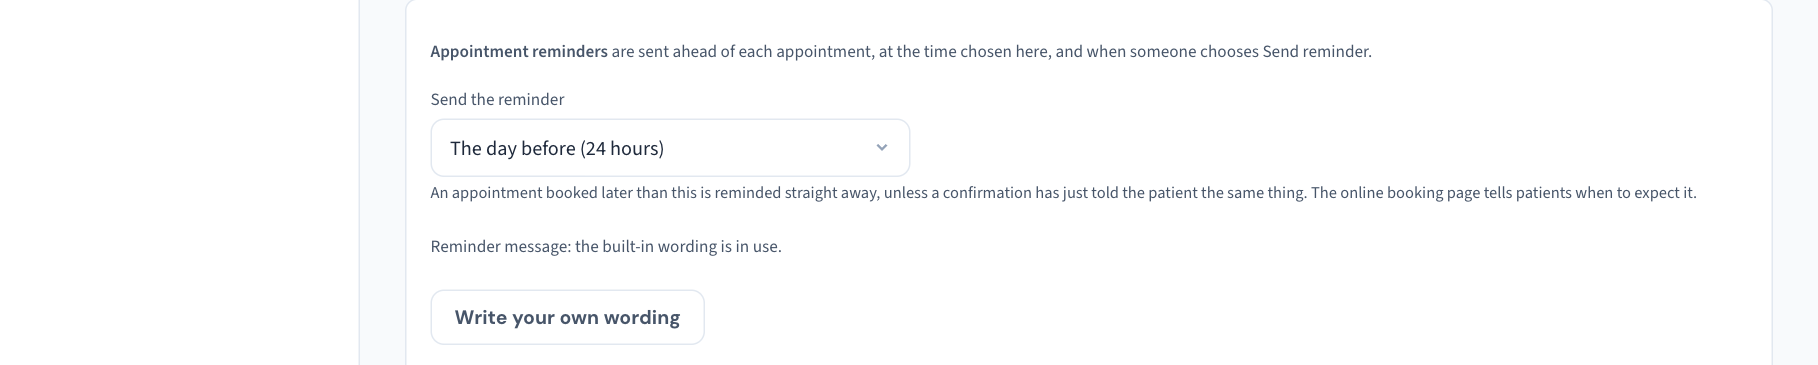
| Choice | What happens |
|---|---|
| The day before (24 hours) | The reminder goes about a day ahead. This is how Curaeon starts |
| 2 hours or 4 hours before | A same-day reminder |
| 2 days, 3 days or A week before | An earlier reminder, for practices that want time to refill a cancelled slot |
| Never: automatic reminders are off | No reminder is sent by itself. Send reminder on an appointment still works (KB-038 — Book, reschedule and track appointments in the Calendar) |
The choice saves at once and applies to every appointment from then on. Two things to know:
- An appointment booked closer than the time you chose is reminded straight away, unless a confirmation has just told the patient the same thing.
- If you choose a longer time, appointments already inside the new period that have not been reminded are reminded at the next pass, within a few minutes. Changing from the day before to a week before sends reminders for the coming week's appointments.
Each appointment is reminded once. The online booking page tells patients when to expect the reminder, and changes with this setting (KB-040 — Set up rosters, leave and online-bookable appointment types, and handle online booking requests). The change is recorded in the Audit log as Automatic messages changed, with the old and new time.
Confirm appointments when they are booked or moved
Appointment reminders already go out by themselves ahead of each appointment. An appointment confirmation, the message that tells a patient their appointment is booked, is different: it goes only when someone chooses Send confirmation on the appointment (KB-038 — Book, reschedule and track appointments in the Calendar), unless you turn this on.
- Tick Send a confirmation when an appointment is booked or moved. It saves at once.
- Decide the channel on the Appointment confirmations row of the grid above. With nothing ticked there, confirmations are texts.
From then on, booking an appointment queues a confirmation naming the practitioner, the date and time, and the practice's number. Three kinds of booking are left out:
- a walk-in, or an appointment whose time has already passed, because the patient is at the desk;
- a booking made by an online booking service connected to Curaeon, which sends its own confirmation;
- a patient who cannot be reached on the channels you ticked. They are still booked; no message is queued, and nothing appears on Failed reminders.
When an appointment is moved to a new time or practitioner, the new time is confirmed the same way, including for a booking an online booking service made. And whether or not this is ticked, a patient who was sent a confirmation is always sent the new time when their appointment is moved, because the first message is now wrong.
A patient booked close to their appointment is not told twice. If the confirmation goes out inside the period in which the reminder would be sent, the reminder is not sent as well.
Tell patients about a cancellation, a missed appointment or a completed visit
| Tick | What the patient is sent | When it is not sent |
|---|---|---|
| Tell the patient when their appointment is cancelled | That their appointment with the practitioner on that date and time has been cancelled, and the number to call to rebook. Its row in the grid is Appointment cancellations | For an appointment whose time has already passed. For a patient recorded as deceased or departed |
| Message the patient when they are marked No show | That they were missed at the appointment, and the number to call to rebook. Row: Missed appointments | For an appointment more than a day old, so marking older ones messages nobody |
| Thank the patient when their visit is marked completed | A short thank-you naming the practitioner, with the practice's number. Row: Visit completed | For an appointment more than a day old |
The cancellation message also goes to each patient whose appointment is cancelled by Utilities → Clear a practitioner's day (KB-039 — Clear a practitioner's day when they call in sick). The reason you type when cancelling is not included in the message; ring the patient if they need to know why.
Tell patients what became of an online booking request
If your practice takes requests on its online booking page (KB-040 — Set up rosters, leave and online-bookable appointment types, and handle online booking requests), the tick Tell the patient when their online booking request is confirmed or declined lets the patient know either way. It is off until you tick it.
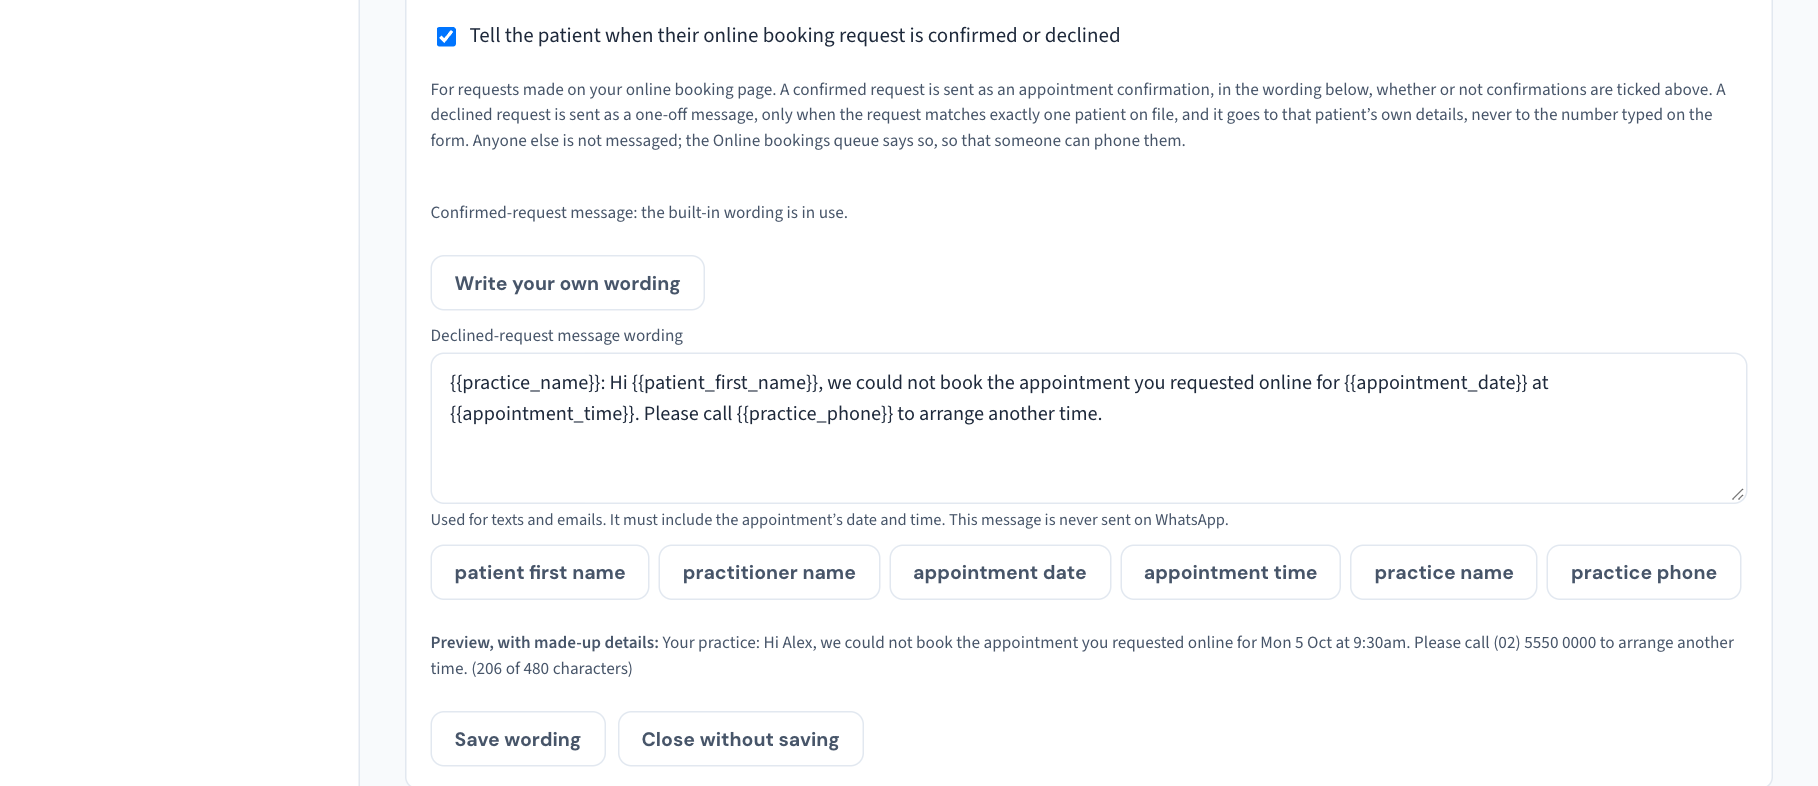
| What staff do | What the patient is sent |
|---|---|
| Confirm the request | One appointment confirmation, in the confirmed-request wording. It is sent whether or not Send a confirmation when an appointment is booked or moved is ticked, and the patient does not get the ordinary confirmation as well. Its row in the grid is Appointment confirmations |
| Decline the request | A message saying the appointment they asked for could not be booked, with the number to call. Its row in the grid is One-off messages, so it goes by text, or by email if you tick Email there. It is never sent on WhatsApp |
Important: A declined message goes only when the request matches exactly one patient in your records, and it goes to the mobile or email on that patient's record, never to the number typed on the booking form. Someone who is not yet a patient, or whose details match more than one record, is not messaged. The Online bookings queue tells you when that happens, so you can phone them.
Both messages can be reworded under the tick, in the same way as the others below. The declined message can include the date and time the patient asked for. It cannot include the reason you type when declining: ring the patient if they need to know why.
Write your own wording for these messages
The appointment reminder, the confirmation, the cancellation message, the missed-appointment message and the visit thank-you each have a built-in sentence. Your practice can replace any of them with its own. The steps are the same for all of them; the picture shows the cancellation one.
The confirmation has two wordings under its tick: the confirmation message, sent when an appointment is booked and when someone chooses Send confirmation (KB-038 — Book, reschedule and track appointments in the Calendar), and the moved-appointment message, sent with the new time when an appointment is moved. Both are used whether or not the tick is on, because a confirmation sent by hand and a move after one are sent regardless.
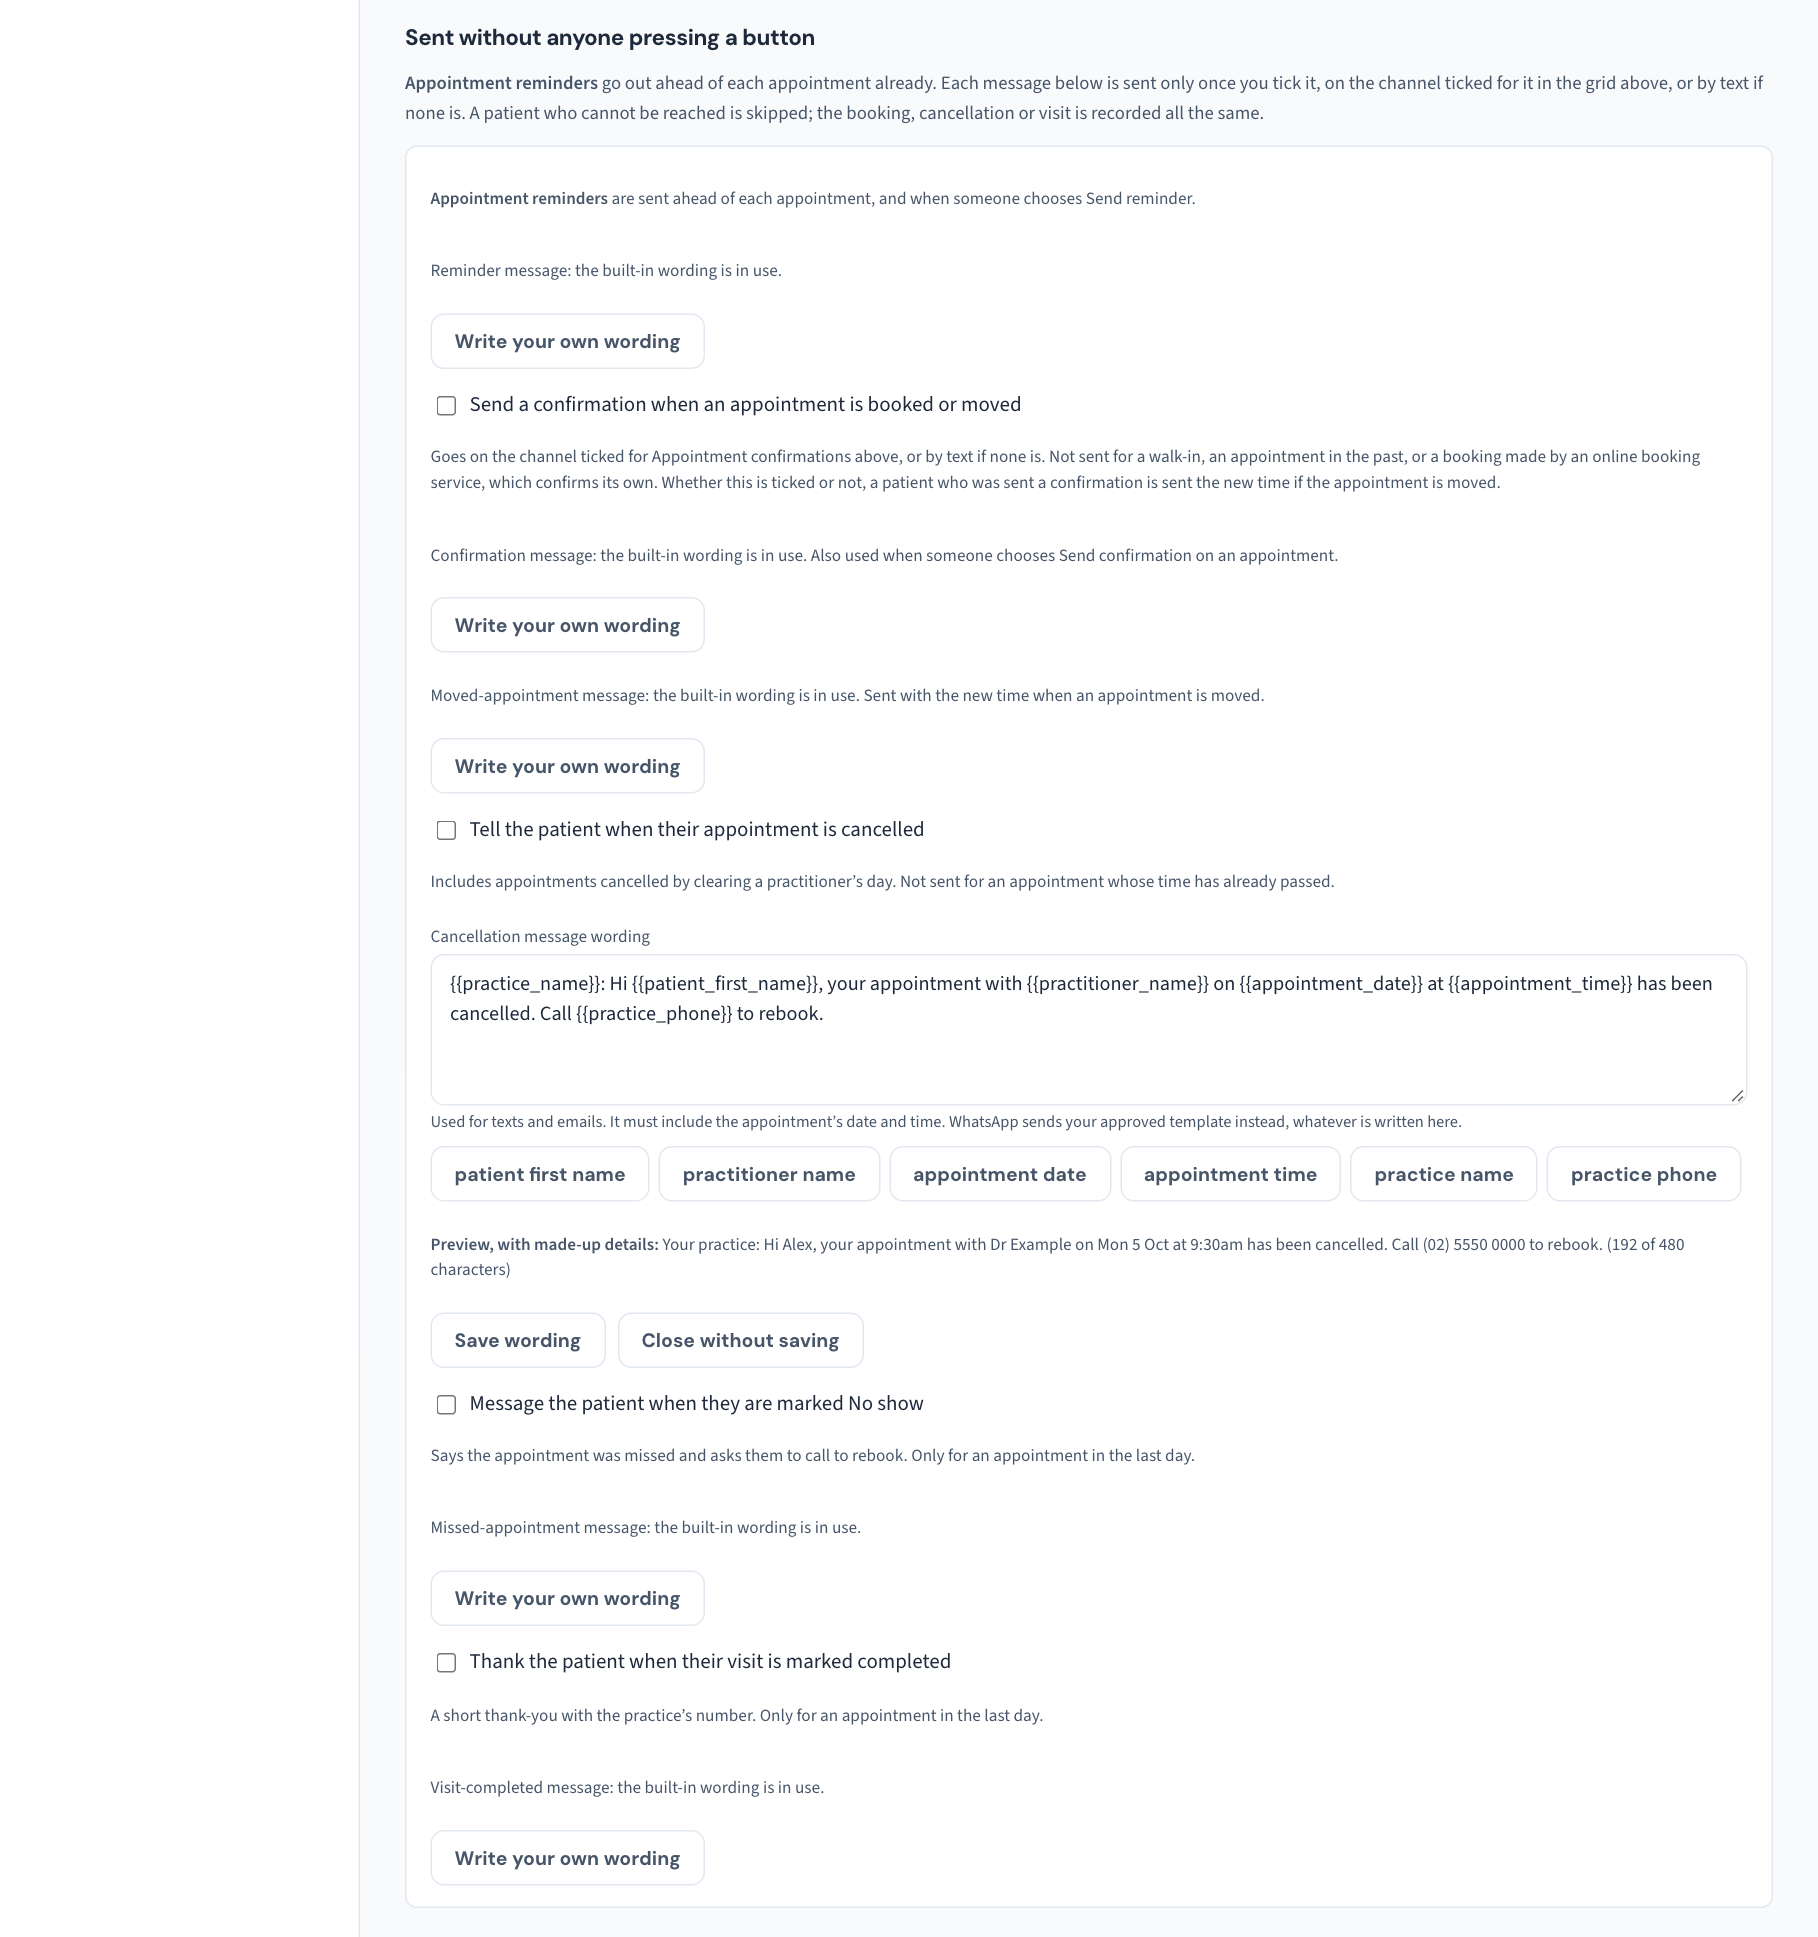
- Under the tick for the message you want to change, choose Write your own wording. The box opens with the built-in sentence in it, so you edit rather than start from nothing.
- Change the words. The parts in double braces are filled in for each patient. Use the buttons under the box to add one: patient first name, practitioner name, appointment date, appointment time, practice name and practice phone. Nothing else can be included.
- Read the Preview, which shows your wording with made-up details, and the character count. The limit is 480 characters.
- Choose Save wording.
Two rules are enforced when you save, and the screen says which one stopped you:
- The wording must include the appointment's date and time, for every message except the thank-you. A patient with two bookings who is told only that "your appointment has been cancelled" does not know which one, and "we missed you" needs to say when.
- It may use only the six details above. A name in braces that is not one of them is refused.
Your wording is used for texts and emails. On WhatsApp each message is always your approved template, whatever is written here, because Meta sends only wording it approved (KB-140 — Arrange WhatsApp with Meta: the account, the number and the message templates Curaeon needs before it can send).
To undo it, open the editor and choose Go back to the built-in wording. Each save is kept as a version and recorded in the Audit log as Message wording saved, so what patients were told before a change can still be answered.
The reminder has no tick: reminders go out ahead of every appointment already. Its wording is at the top of the section, and the automatic reminder and Send reminder (KB-038 — Book, reschedule and track appointments in the Calendar) both use it.
Note: Every appointment message can be reworded here. Recall texts have their own wording, below.
Tip: Decide each of these as a practice. Most practices will want patients told about a cancellation. A message about a missed appointment is a matter of manner; read its wording above and decide whether it suits yours.
Every switch was off for every practice when it was introduced, so no patient is messaged until a practice chooses to.
What is recorded
-
Turning any of the automatic messages on or off is in the Audit log as Automatic messages changed, with who did it.
-
A change to a channel is in the Audit log as Messaging channel changed, with the old and new values. A password, key or token is shown only as set, replaced or removed, never as its value.
- A change to the grid is Message routing changed.
- Each test is Messaging channel test sent, whether it worked or not, with where it was sent.
- The weekly Security review lists messaging channel changes among its rare changes worth a second look (KB-064 — Sign off the weekly Security review, and act on alerts and audit-log check warnings).
Write your own INR reminder
Below the automatic messages, INR reminder wording holds the sentence sent when someone chooses Remind or Remind all overdue on the INR worklist.
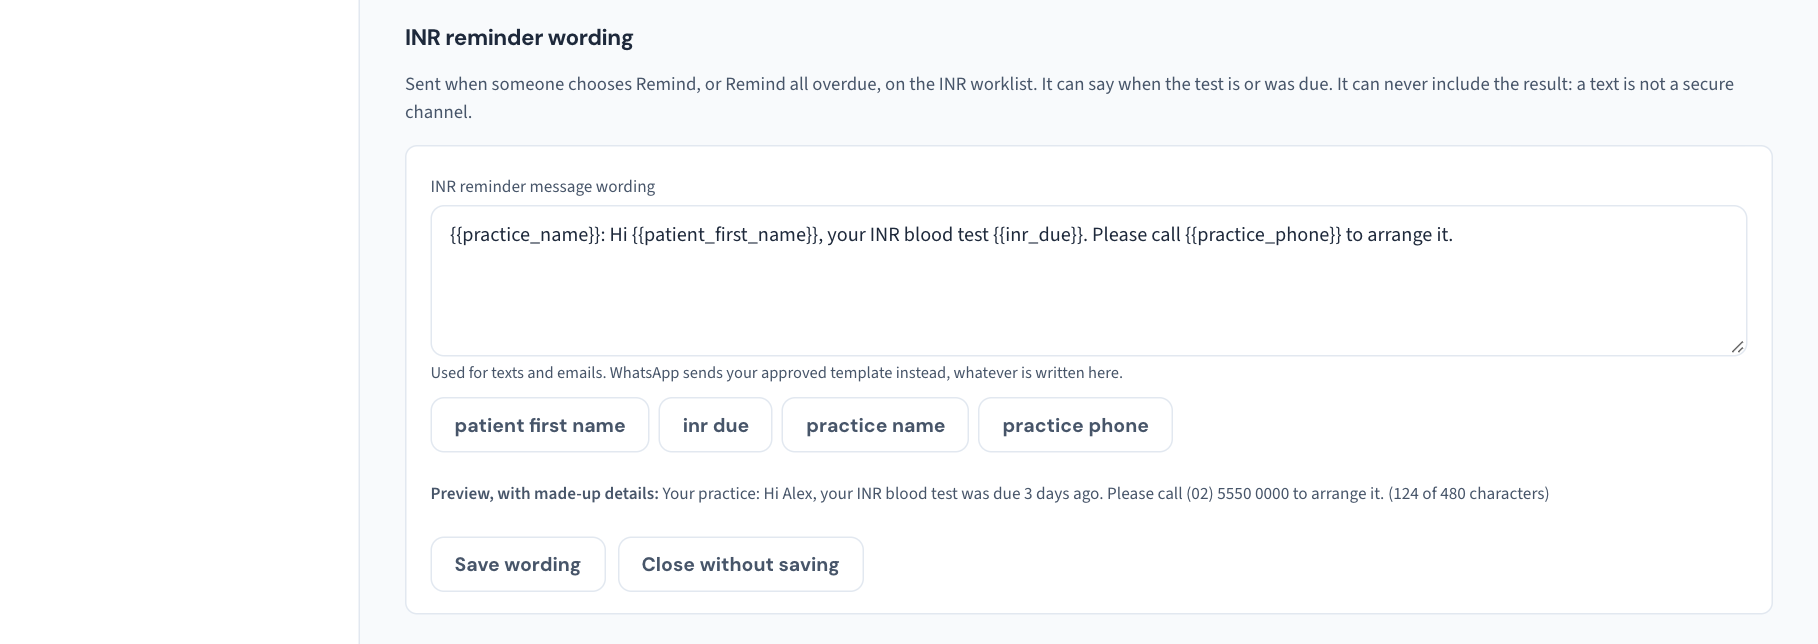
- Choose Write your own wording. The box opens with the built-in sentence in it.
- Change the words. Four details can be included, using the buttons under the box: patient first name, inr due, practice name and practice phone. inr due fills in when the test is or was due, in words: "is due", or "was due 3 days ago".
- Read the Preview and choose Save wording.
Important: The INR reminder can never include the result. No detail offered here carries it, and anything else in double braces is refused when you save. A text is not a secure channel: a result belongs in a conversation with the patient, not on a lock screen.
The wording is used for texts and emails; on WhatsApp the approved template is sent (KB-140 — Arrange WhatsApp with Meta: the account, the number and the message templates Curaeon needs before it can send). Choose Go back to the built-in wording to undo it. Each save is kept as a version and recorded in the Audit log as Message wording saved.
One-off messages: the messages staff can send from a record
Staff can send one patient a short message from their record, with Send a message on the Messages panel (KB-141 — Send a patient a one-off message from their record). What they can send is set in the One-off messages section at the foot of this screen.
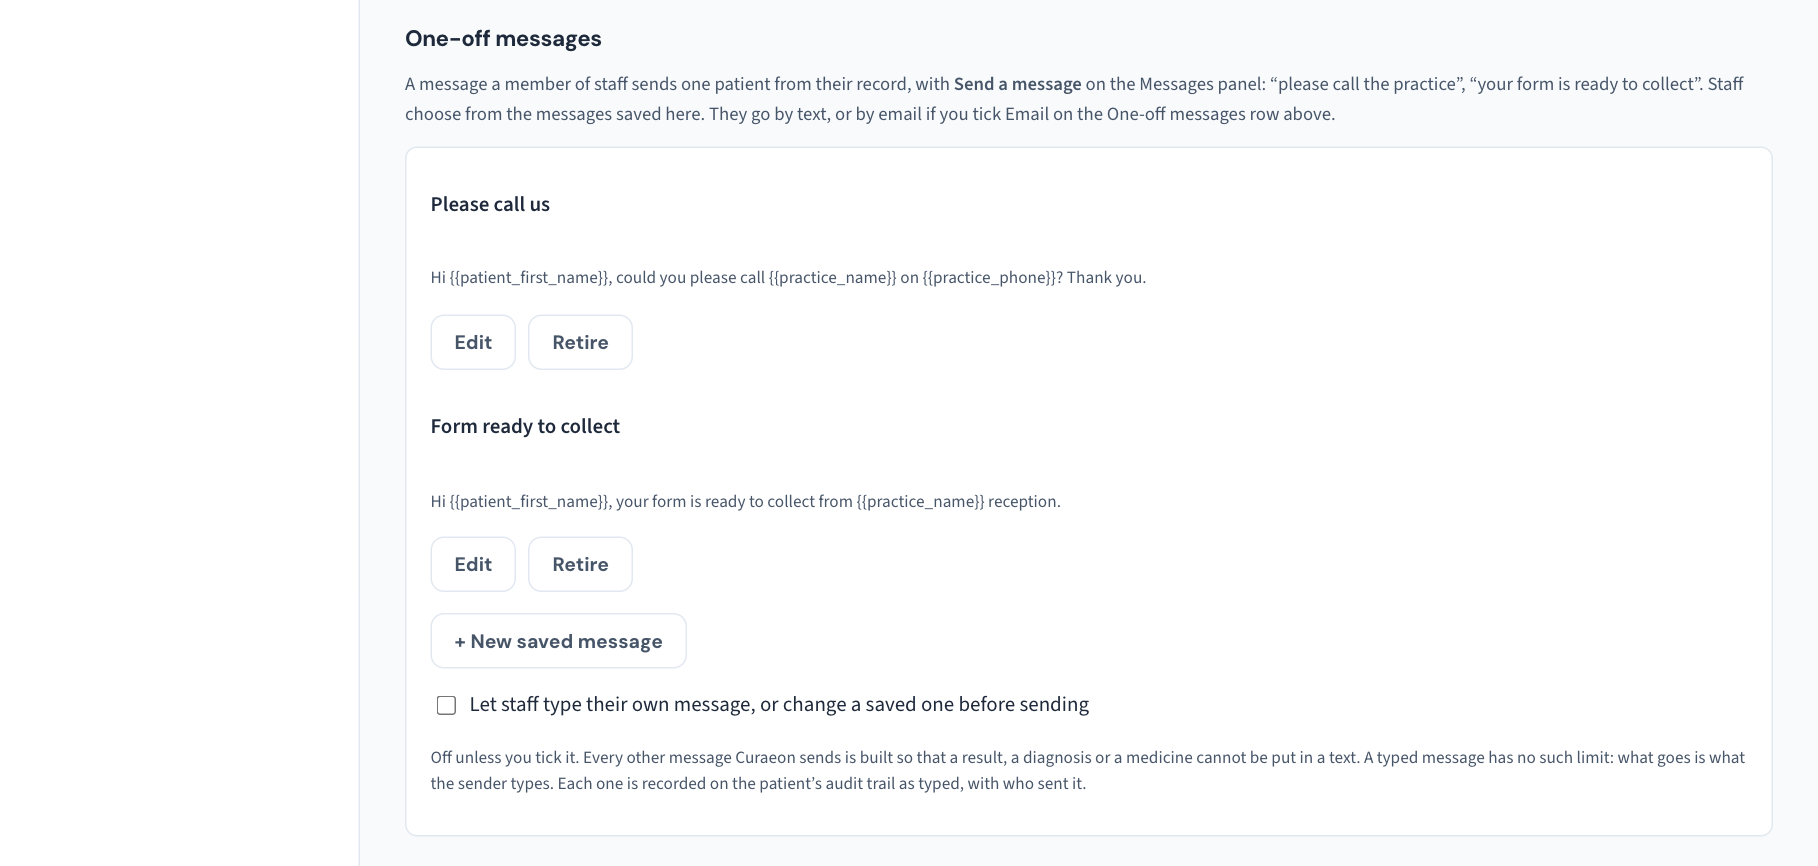
Write a saved message
- Choose + New saved message.
- Give it a Name. This is what staff see in the list.
- Write the Message. Three details can be filled in for each patient, using the buttons under the box: patient first name, practice name and practice phone. Nothing else can be.
- Read the Preview and choose Save message.
Write messages that ask the patient to do something: call, collect a form, bring a card. Do not write one that would carry a result or a diagnosis.
Change or remove one. Edit saves a new version; earlier versions are kept, so a message already sent still shows the words it said. Retire takes it off the list staff choose from.
Let staff type their own. The tick Let staff type their own message, or change a saved one before sending is off until you tick it. With it off, staff can only send your saved messages exactly as written. With it on, they can also type anything, up to 480 characters.
Important: Decide this as a practice. Every other message Curaeon sends is built so that a result, a diagnosis or a medicine cannot be put in a text. A typed message has no such limit: what goes is what the sender types. Each typed message is recorded on the patient's audit trail as typed, with who sent it.
One-off messages go by text, or by email if you tick Email on the One-off messages row of the grid. They never go by WhatsApp. Saving a message is recorded in the Audit log as Message wording saved, retiring one as Saved one-off message retired, and the tick as Typed one-off messages allowed or stopped.
The message that goes with a letter or referral
When someone sends a patient their letter or referral, the Send to patient box starts with a short message (KB-050 — Email a letter to a patient: password, refused characters, "I can't open it"). You can write your practice's own, one for letters and one for referrals, in the Message with a letter or referral section near the foot of this screen.
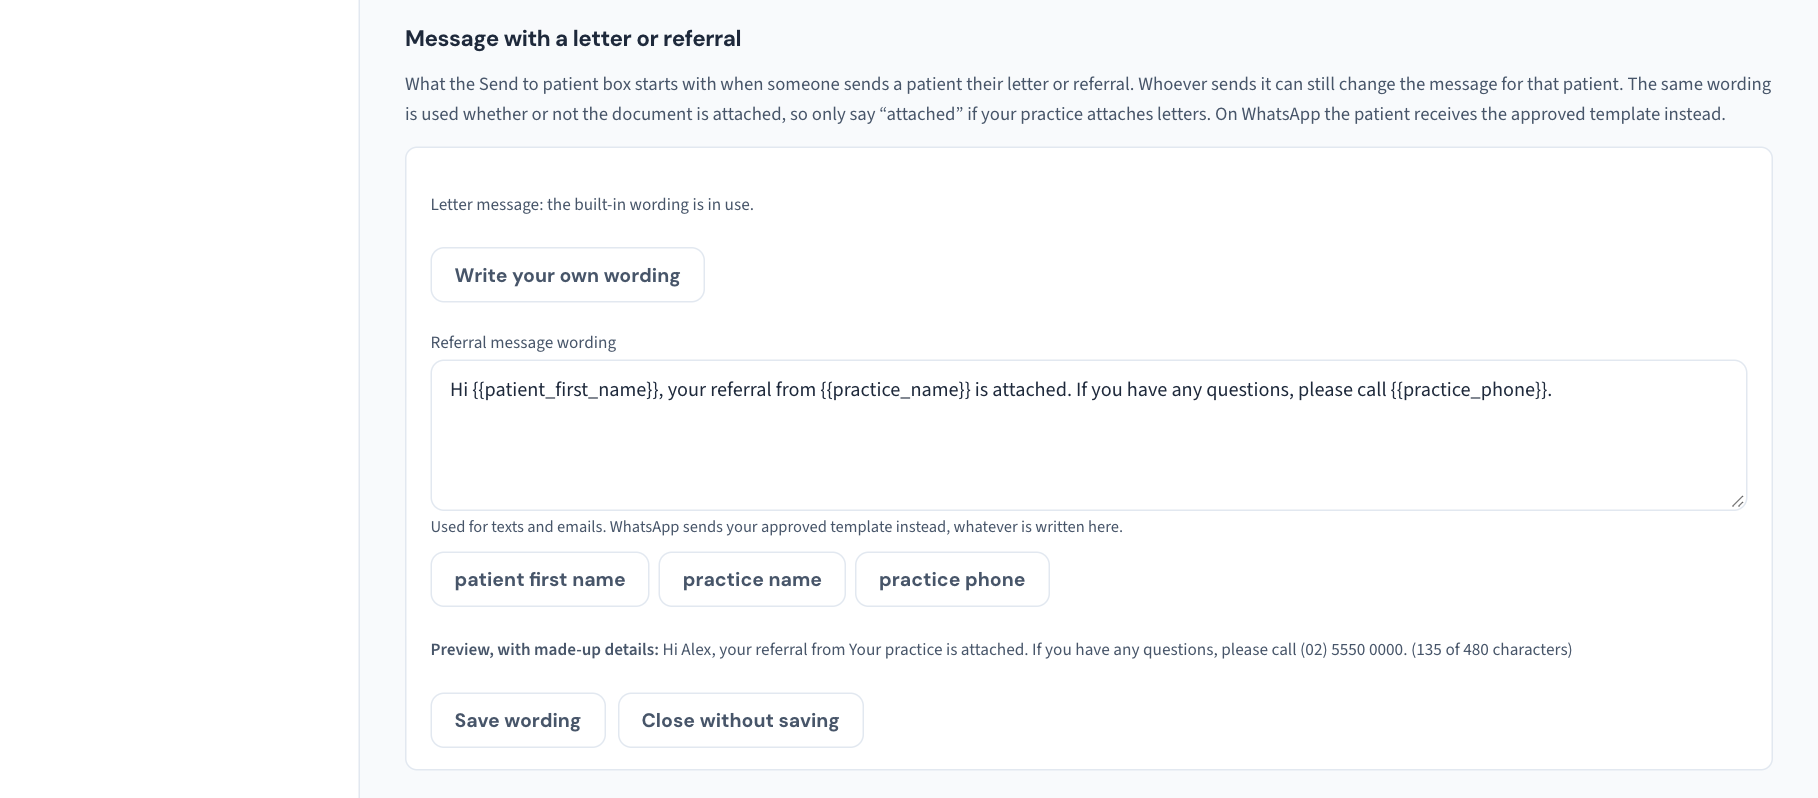
- Choose Write your own wording under the letter message or the referral message.
- Change the wording. Three details can be filled in for each patient, using the buttons under the box: patient first name, practice name and practice phone. Nothing else can be.
- Read the Preview and choose Save wording.
This message is a starting point. Whoever sends the document sees it in the box and can change it for that patient before sending.
Note: Your wording is used whether or not the document is attached. Only say "attached" if your practice ticks Attach the document on the Letters or Referrals row of the grid. The built-in wording takes care of this itself: it says the document is attached when it is, and that it is ready when it is not.
The wording is used for texts and emails; on WhatsApp the approved template is sent (KB-140 — Arrange WhatsApp with Meta: the account, the number and the message templates Curaeon needs before it can send). Choose Go back to the built-in wording to undo it. Each save is kept as a version and recorded in the Audit log as Message wording saved.
Your own text on the online booking page
The page patients use to request an appointment online has built-in text. You can add two notes of your own in the Online booking page section near the foot of this screen.
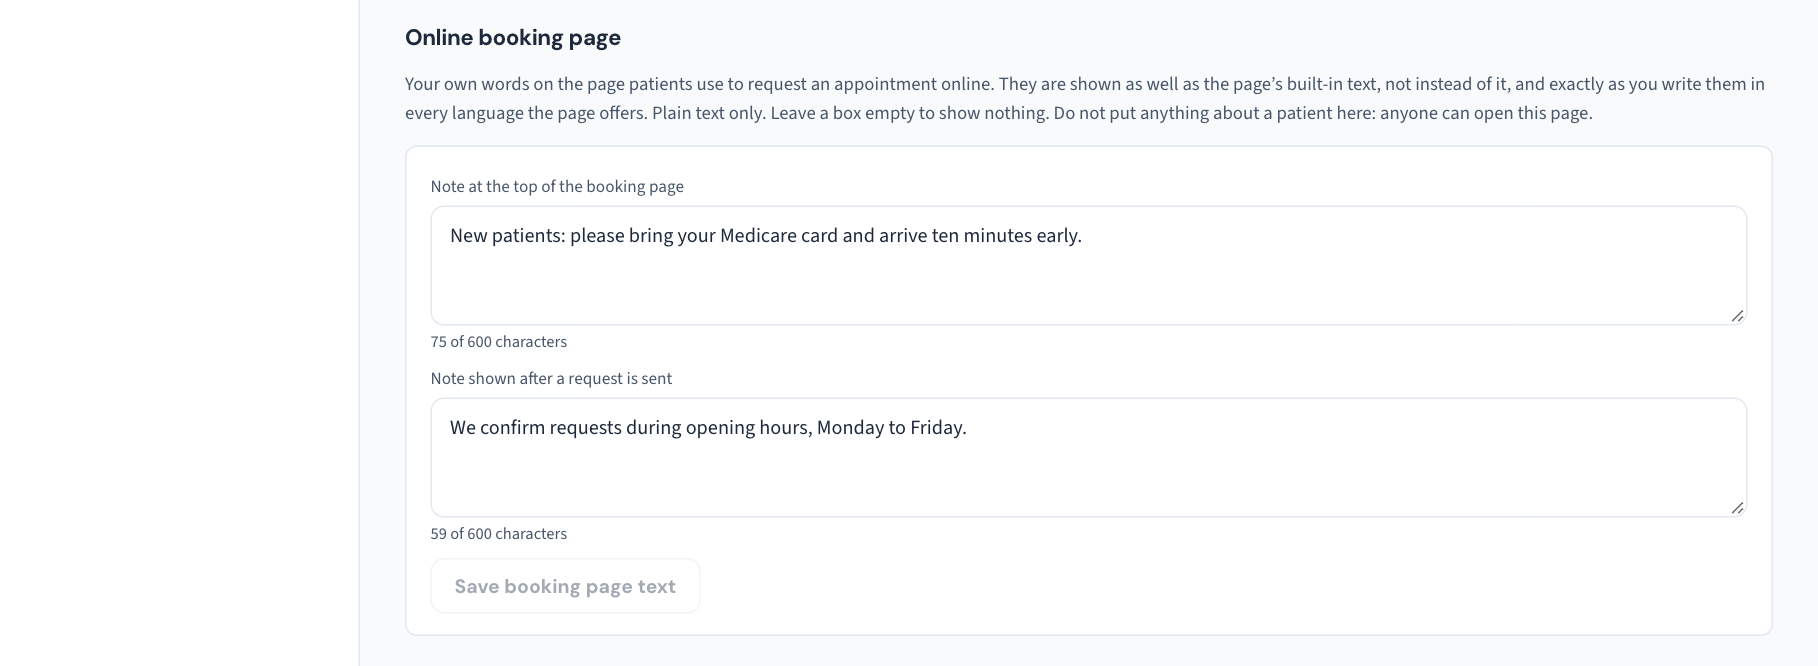
| Box | Where patients see it |
|---|---|
| Note at the top of the booking page | Under the first question, before they choose an appointment type. Good for "bring your Medicare card" or "for anything urgent, call us" |
| Note shown after a request is sent | On the last screen, under the built-in message. Good for saying when you confirm requests |
- Type the note. Each can be up to 600 characters. Press Enter for a new line.
- Choose Save booking page text. The booking page shows it straight away.
Your notes are shown as well as the built-in text, not instead of it. The built-in text is translated into the languages the page offers; your notes appear exactly as you wrote them in every language. They are plain text: a web address is shown as text, not as a link, and the characters < and > are not accepted. Empty a box and save to remove a note.
Important: Anyone can open the booking page. Never put anything about a patient in these notes.
The change is recorded in the Audit log as Online booking page text changed.
Message wording for recall texts
The sentence a recall text uses is not set on this screen. Open Recalls in the sidebar and choose the Message wording tab. Anyone can read it; writing wording needs the comms.send permission, which every role holds unless your practice has changed it (KB-121 — Change what each role may do in Settings → Permissions).
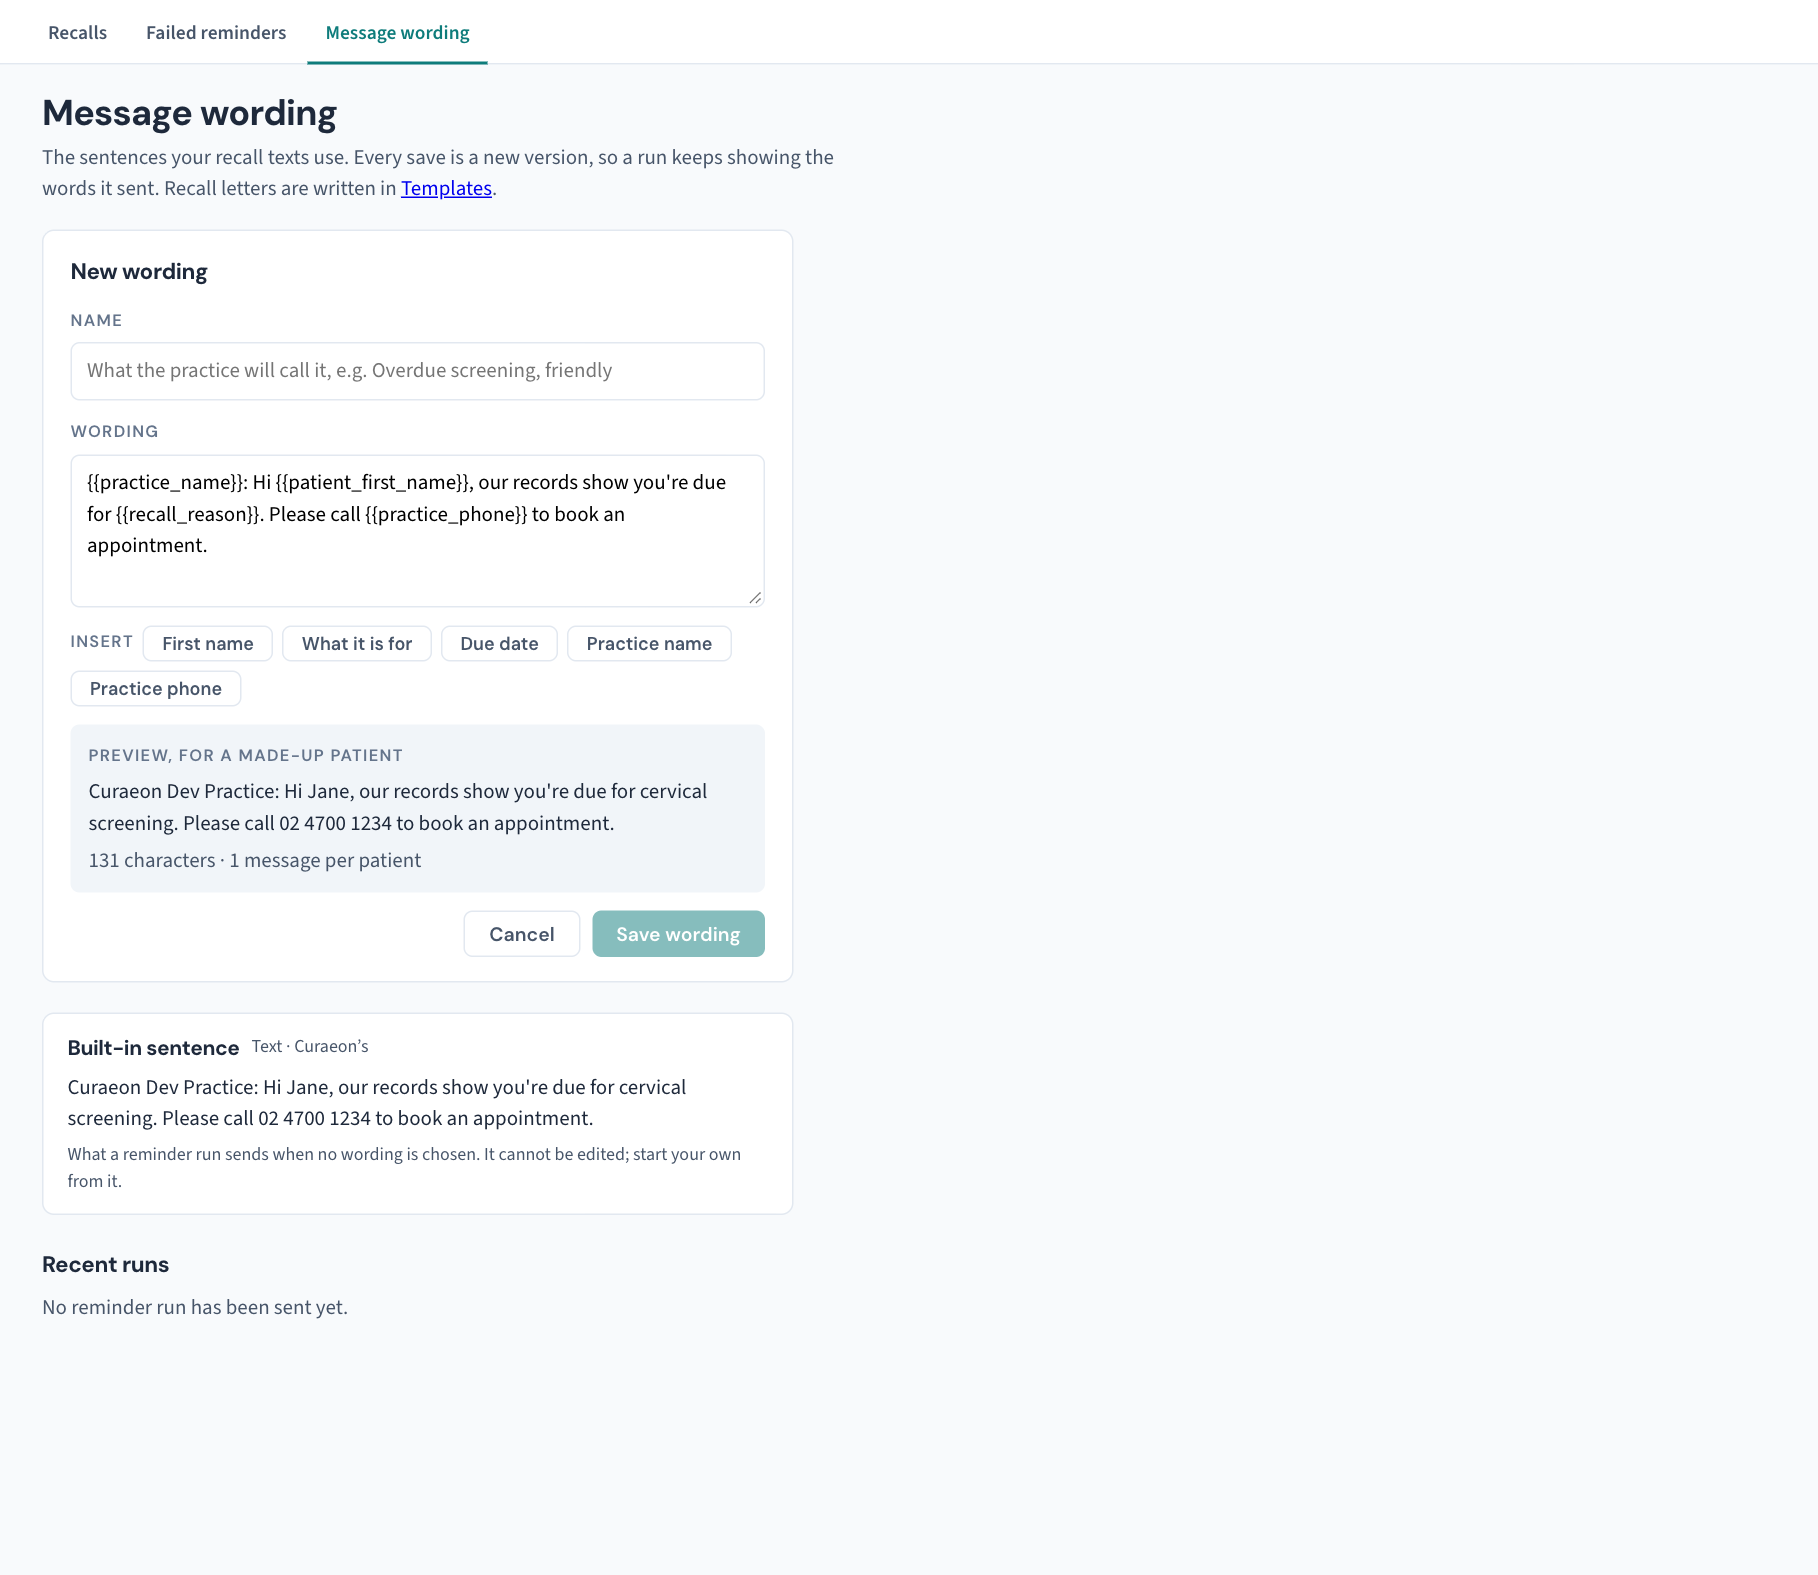
The page lists the Built-in sentence first. That is what a reminder run sends when no wording is chosen. It cannot be edited, and a new wording starts as a copy of it.
Write a new wording
- Choose + New wording.
- Enter a Name: what your practice will call it.
- Edit the Wording.
- Use the Insert buttons to add a field where the cursor is: First name, What it is for, Due date, Practice name, Practice phone. These five are the only fields a message may use. Anything else in double curly brackets is refused, which is what stops a text ever carrying a result or another detail from the record.
- Read the Preview, for a made-up patient. Under it is the cost: the number of characters and how many messages each patient's text will be billed as.
- Choose Save wording.
If the preview warns that the text has characters "not in the plain SMS alphabet", each message holds 70 characters instead of 160 and the run costs more. Curly quotes pasted from a word processor are the usual cause; Use straight quotes fixes them.
Change a wording. Choose Edit on it, change the text, and choose Save new version. Every save is a new version and never an edit, so a run that used version 2 still shows the words it sent after version 3 exists. Versions lists the earlier ones.
Use a wording in a reminder run. In Recalls, the Remind N overdue window has a Wording list: Built-in sentence or one of yours, with a preview. It starts on the wording marked Used by Send reminder. See KB-051 — Run recalls: book from a recall, and why a recall stays open or comes back.
Choose the wording for Send reminder. Send reminder on a single recall has no window to choose wording in, so it sends the wording marked Used by Send reminder on this page. To change it, choose Use for Send reminder on one of your text wordings, or on the Built-in sentence to go back to it.
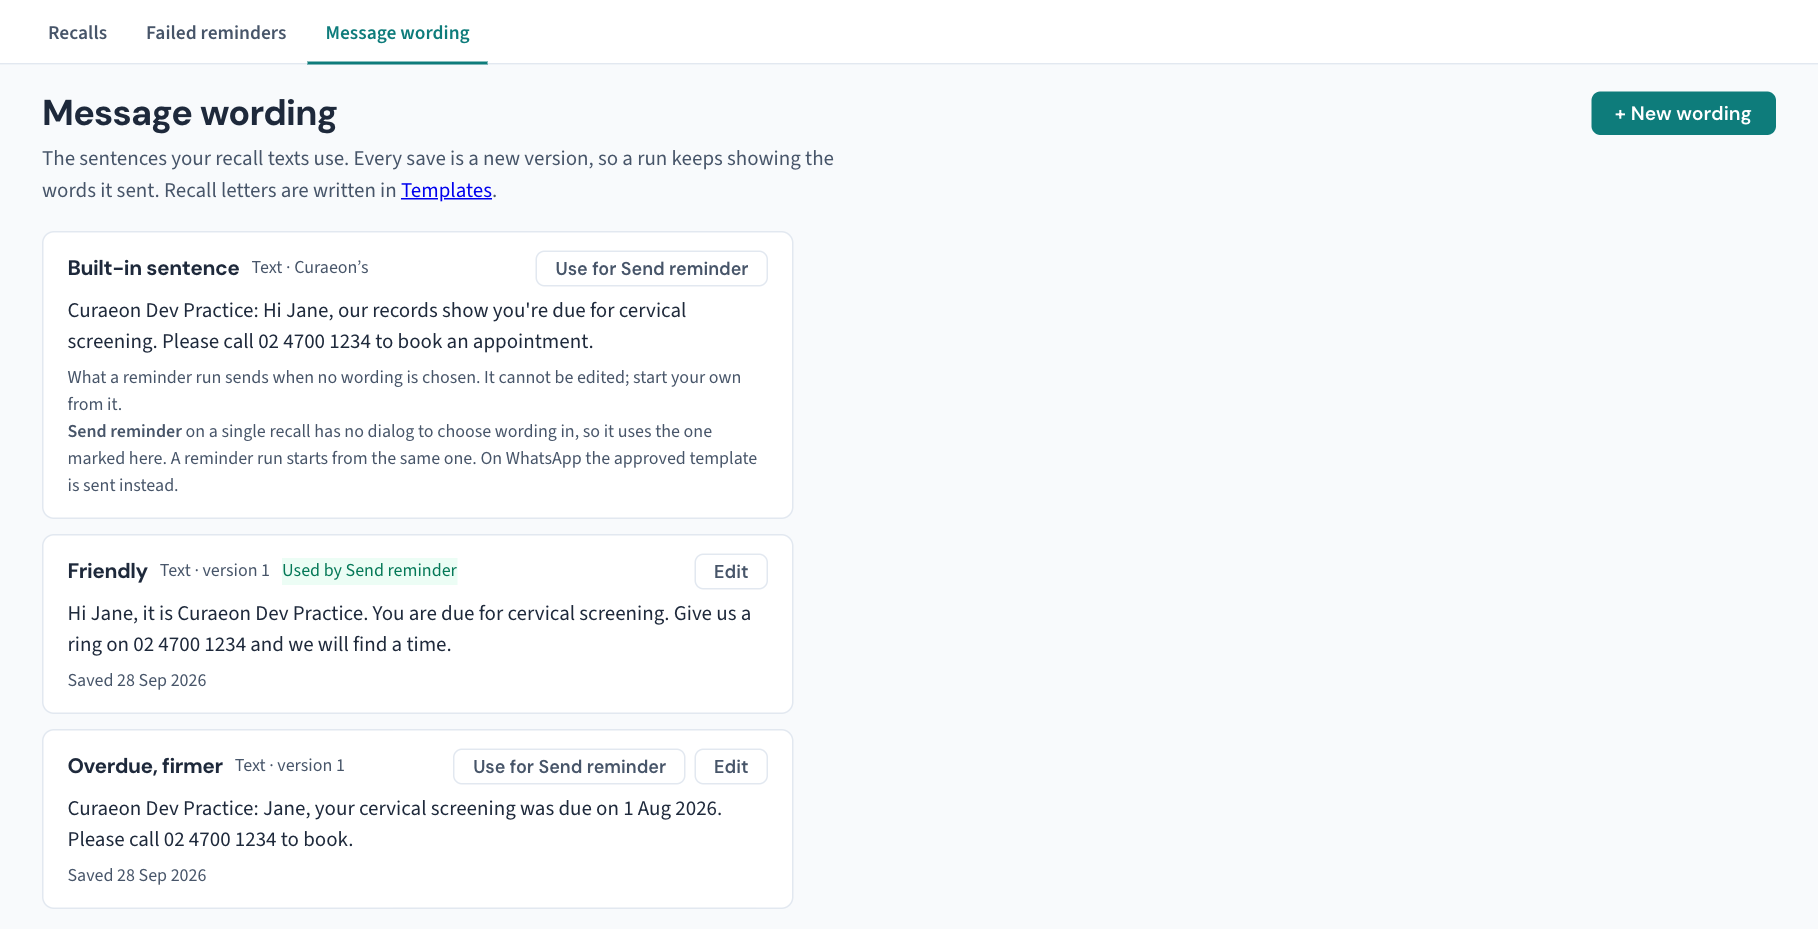
Until you choose one, Send reminder sends the built-in sentence, as it always did. If you later edit the chosen wording, Send reminder uses the new version. On WhatsApp the approved template is sent instead (KB-140 — Arrange WhatsApp with Meta: the account, the number and the message templates Curaeon needs before it can send). The choice is recorded in the Audit log as Wording for a single recall reminder chosen.
Recent runs at the foot of the page lists each reminder run: when, its name, the wording and version it used, how many were sent, and how many were not sent and why (no mobile, no address, contacted in the last fortnight, died or left).
Recall letters are not written here. They are a document template under Settings → Templates (KB-049 — Build and import letter templates: Word upload, merge fields, pronoun fields, snippets). Saving a wording is recorded in the Audit log as Message wording saved.
If that didn't work
| What you see | What to do |
|---|---|
| "Couldn't load the messaging settings — … Nothing here is confirmed off." | The page could not be read; nothing has been switched off. Choose Retry. |
| "no encryption key is configured, so a gateway credential cannot be sealed" | The server is not set up to store passwords safely, so it will not store one at all. Raise a ticket. |
| A message saying a field "belongs in the credential field, which is sealed; settings are readable" | A password or key was typed into an ordinary field. Put it in the Password, API key or Access token box. |
| "a DKIM selector and key go together…" | Enter both the selector and the private key. |
| Test fails with "a username is set but no password has been entered" | Type the password, or clear the username if your mail server needs neither. |
| Test fails with "the SMTP host and the from address are both required" | Fill in both and test again. |
| Test fails saying the mail server did not offer encryption, or its certificate could not be verified | The mail server must encrypt. Talk to whoever runs it; if it is a server on your own network with a certificate from your own authority, raise a ticket so the practice server can be told to trust it. |
| The test works and patients still say nothing arrives | Run Check DNS records and follow KB-060 — Patient emails or SMS reminders not arriving: check Settings → Patient messaging. |
Still stuck? Raise a ticket at support.curaeon.com.au or call 1300 XXX XXX. If your clinic can't see patients right now, call and choose option 1. Support is staffed Monday to Friday, 8:00–18:00 Sydney time; outside those hours a call or text to the same number is answered on a best-effort basis.
Related articles
- KB-141 — Send a patient a one-off message from their record — Send a patient a one-off message from their record
- KB-038 — Book, reschedule and track appointments in the Calendar — Book, reschedule and track appointments in the Calendar
- KB-115 — Find your way around Settings: every section, who can open it, and where to read more — Find your way around Settings: every section, who can open it, and where to read more
- KB-060 — Patient emails or SMS reminders not arriving: check Settings → Patient messaging — Patient emails or SMS reminders not arriving: check Settings → Patient messaging
- KB-123 — Read the reminder queue in Settings → Messages, and know which messages screen you need — Read the reminder queue in Settings → Messages, and know which messages screen you need
- KB-050 — Email a letter to a patient: password, refused characters, "I can't open it" — Email a letter to a patient: password, refused characters, "I can't open it"
- KB-051 — Run recalls: book from a recall, and why a recall stays open or comes back — Run recalls: book from a recall, and why a recall stays open or comes back
- KB-089 — Emailing patients FAQ — Emailing patients FAQ
- KB-140 — Arrange WhatsApp with Meta: the account, the number and the message templates Curaeon needs before it can send — Arrange WhatsApp with Meta: the account, the number and the message templates Curaeon needs before it can send